









Your cart is empty
Pick a product to get started. Design it online or upload your own file.
Browse all productsShop by product
Need something custom? Request a quote


A print-ready file is one we can send straight to press without changes. It comes down to six things: a PDF, CMYK colours, 300 dpi images, 3 mm bleed, a 3 mm safe zone and embedded fonts. Here’s what each one means and how to get it right.
We print from PDF files. A PDF locks your layout, fonts and images in place, so what you designed is what gets printed. In InDesign, Illustrator or Affinity, export a high quality print PDF. The PDF/X-4 preset works well.
Supply one PDF per design, with every page in it. A double-sided business card is one PDF with two pages: the front as page 1 and the back as page 2.
Your screen makes colour from light (RGB). A printing press makes colour from four inks: cyan, magenta, yellow and black (CMYK). Convert every colour in your file to CMYK before you export.
If you leave colours in RGB, they get converted at print time. Bright blues, greens and oranges are the most likely to shift or go a little dull. Choosing your colours in CMYK from the start means no surprises.
Photos and graphics should be 300 dpi at the size they print. Images saved from websites and social media are usually 72 dpi. They look fine on screen but print soft or pixelated.
Making a small image bigger doesn’t add detail. Always start with the largest original you have, and ask your designer or photographer for the full size file. Large signs and banners are the exception, as they’re viewed from further away.
Bleed is extra background that runs past the edge of your page. We print on large sheets and trim them down, and the cut can move very slightly. Bleed means there’s no white sliver along the edge if it does.
| Product | Bleed |
|---|---|
| Business cards, flyers and most printed products | 3 mm |
| Stapled booklets | 5 mm |
| Large format and signage, single sided | 5 mm |
| Large format and signage, double sided | 10 mm |
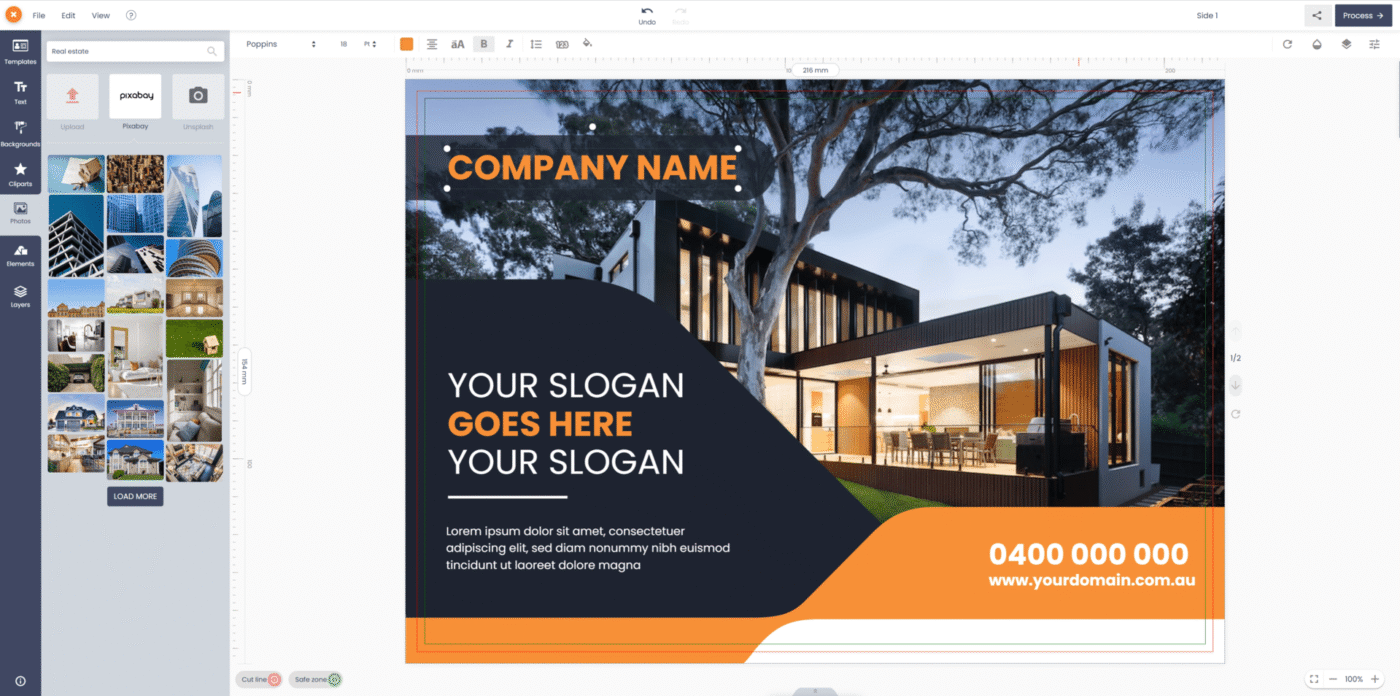
Set your page to the finished size, then add bleed around it. An A5 flyer trims to 148 x 210 mm. With 3 mm bleed on each side, the page is 154 x 216 mm. Include crop marks when you export, so we know exactly where the edge is.
Just as the background should run past the edge, your important content should stay away from it. Keep text, logos and contact details at least 3 mm inside the trim line.
Avoid thin borders near the edge too. They show every bit of cutting movement, and on double-sided jobs the front and back can sit 1 to 2 mm apart.
Every font has to be embedded in the PDF or converted to outlines. If a font is missing, a default font gets swapped in and your layout changes. Most print PDF presets embed fonts for you, but it’s worth checking before you send.
Bonus tip: rich black for big black areas
Plain black ink (0/0/0/100) can look grey and patchy across a large area. For big black backgrounds, use a rich black that mixes in some colour, such as 60/50/50/100 on card. Keep small text in plain black so it stays crisp.
You can still print a great result. In Canva, turn on print bleed (File, then Settings, then Show print bleed), then download as PDF Print with crop marks and bleed ticked. On a paid Canva plan you can also choose CMYK when you download.
Word isn’t really built for print layouts. It doesn’t handle bleed well, and colours are RGB. If you’re working in Word, our online designer is usually the easier path.
Every file goes through an artwork check before it prints. If it ticks every box, it goes straight to press. If something needs fixing, we email you first and explain exactly what to change. Small issues we can often fix for you, and we’ll always tell you about any cost before we do.
Don’t have design software, or don’t want to deal with bleed and colour modes? Every product in our online designer is already set to the right size, with bleed and safe zone guides built in. Pick a ready-made template, make it yours and order. The print file is created for you.
Want the full detail?
Our artwork guides cover every product, from business cards to signage, including special finishes and folds.
A print-ready file can go straight to press without changes. It’s a PDF at the right size, in CMYK, with 300 dpi images, 3 mm bleed, a 3 mm safe zone and embedded fonts.
Bleed is extra background, usually 3 mm, that runs past the edge of your design. It’s trimmed off, so your colour reaches the edge with no white line.
We print from PDF. If you only have an image file, place it in a page at the right size with bleed and export a PDF, or upload it into our online designer and order from there.
Appointment cards, letterheads, patient brochures and waiting room posters for medical, dental and allied health clinics, plus the Ahpra advertising rules to keep in mind.
Read the guideWhat real estate agents should print at each stage of a campaign, from just sold postcards and for sale signs to property brochures and open home banners.
Read the guideWhat a builder's sign needs to show, which corflute and mesh banner sizes suit your site, safety sign colours, and design tips for signs people can read from the road.
Read the guideDesign it online
Pick a product, choose a template and make it yours. Bleed and safe zones are already set up. Printed in Australia.